
What is Workloadify
Workloadify turns your monday.com boards into a real-time picture of who is working on what, so you can balance your team's workload and assign every task to the person who actually has capacity.
Instead of juggling spreadsheets and guesswork, Workloadify rolls up effort by person and by day across all of your connected boards. Overload — and free capacity — becomes obvious at a glance, and you can assign or reassign work without ever leaving the item you're already in.
This guide walks you through everything from the first setup to day-to-day planning and assignment.
What you can do with Workloadify
- Visualize workload by person and by date, in day, week, or month views.
- Spot overload instantly — see who is maxed out and who has room for more.
- Assign and reassign directly from an item, with suggested people ranked by free capacity.
- Model real capacity per person: working days, daily hours, time off, and public holidays.
- Plan across multiple connected boards in one unified view.
- Organize your team with reusable roles and skills.
Workloadify is built for project managers, team leads, agencies, and resource planners — anyone who needs to staff projects and sprints, balance billable work, and keep delivery on track.
How Workloadify is structured
Workloadify has three places you'll work in:
- The Workload view — a dashboard that shows your whole team's workload over time. This is your home base.
- Resource Management — a tab (next to Workload) where you manage each person's working days, capacity, roles, skills, time off, and holidays.
- The Workloadify Assignee item view — an item view that lives inside individual items, so you can assign the right person while working on a task.
A quick note on terminology, since Workloadify builds on monday.com:
- A board is a monday.com project or list of work.
- An item is a single task or row on a board.
- A column holds one type of information for an item (for example a People column, a Status column, a Timeline column, or a Numbers column).
- A resource is a person whose workload and capacity Workloadify tracks.
- Effort is how much work an item requires (for example, hours).
Part 1 — Add Workloadify to your account
After installing Workloadify, add it as an object view so it opens as a dedicated dashboard.
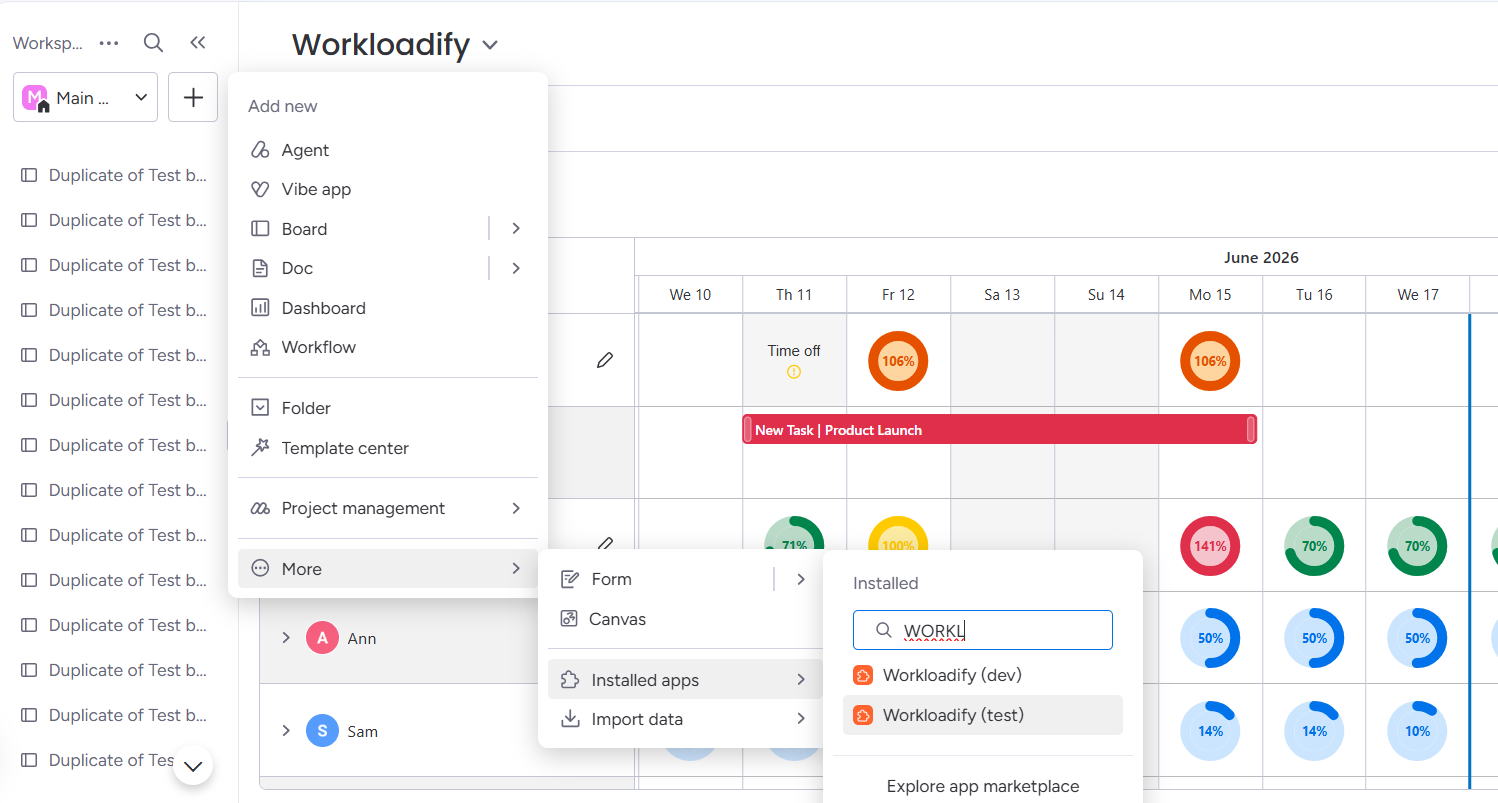
You can add as many Workloadify views as you like — for example on different boards or dashboards — but they all share the same configuration. You connect your boards and map your columns once, and every Workloadify view reflects that same setup.
The first time you open it, the view is empty and shows a No workload yet screen with a short setup overview. Click Configure workload to start.
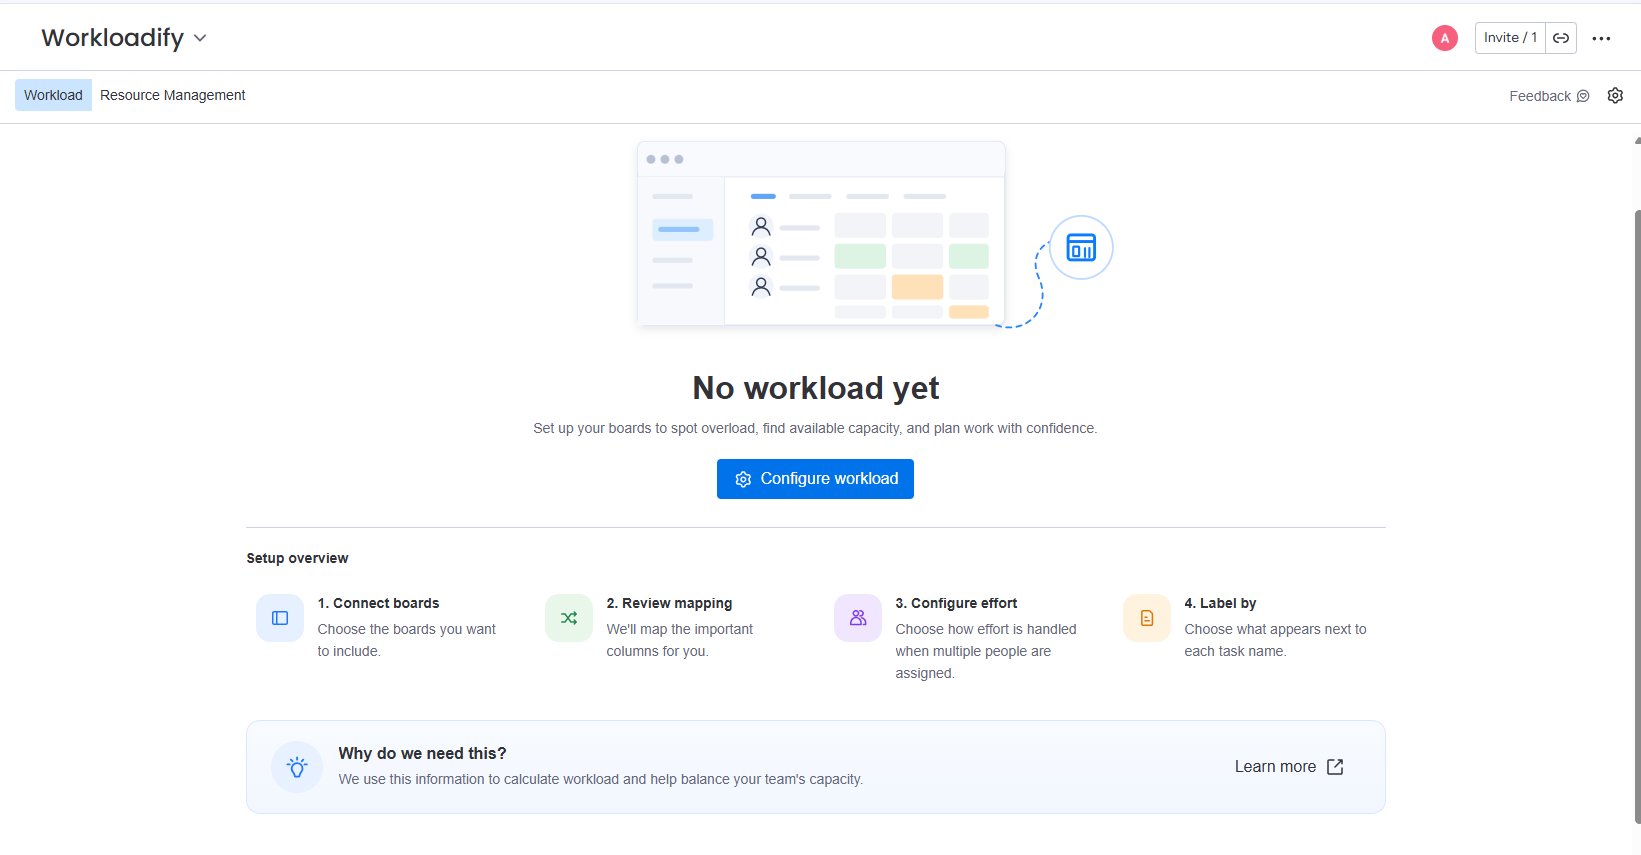
Configure your workload
Clicking Configure workload (or the gear icon in the top-right) opens the Configuration panel. This is where you tell Workloadify which work to include and how to read it.
The panel is organized into sections you can expand one at a time:
- Select Boards — choose which boards feed the workload.
- Columns — map the columns Workloadify reads.
- Effort — choose how effort is split when several people share an item.
- Label by — choose what extra context appears next to each item.
- Workloadify Assignee item view — options for the in-item assignment view.
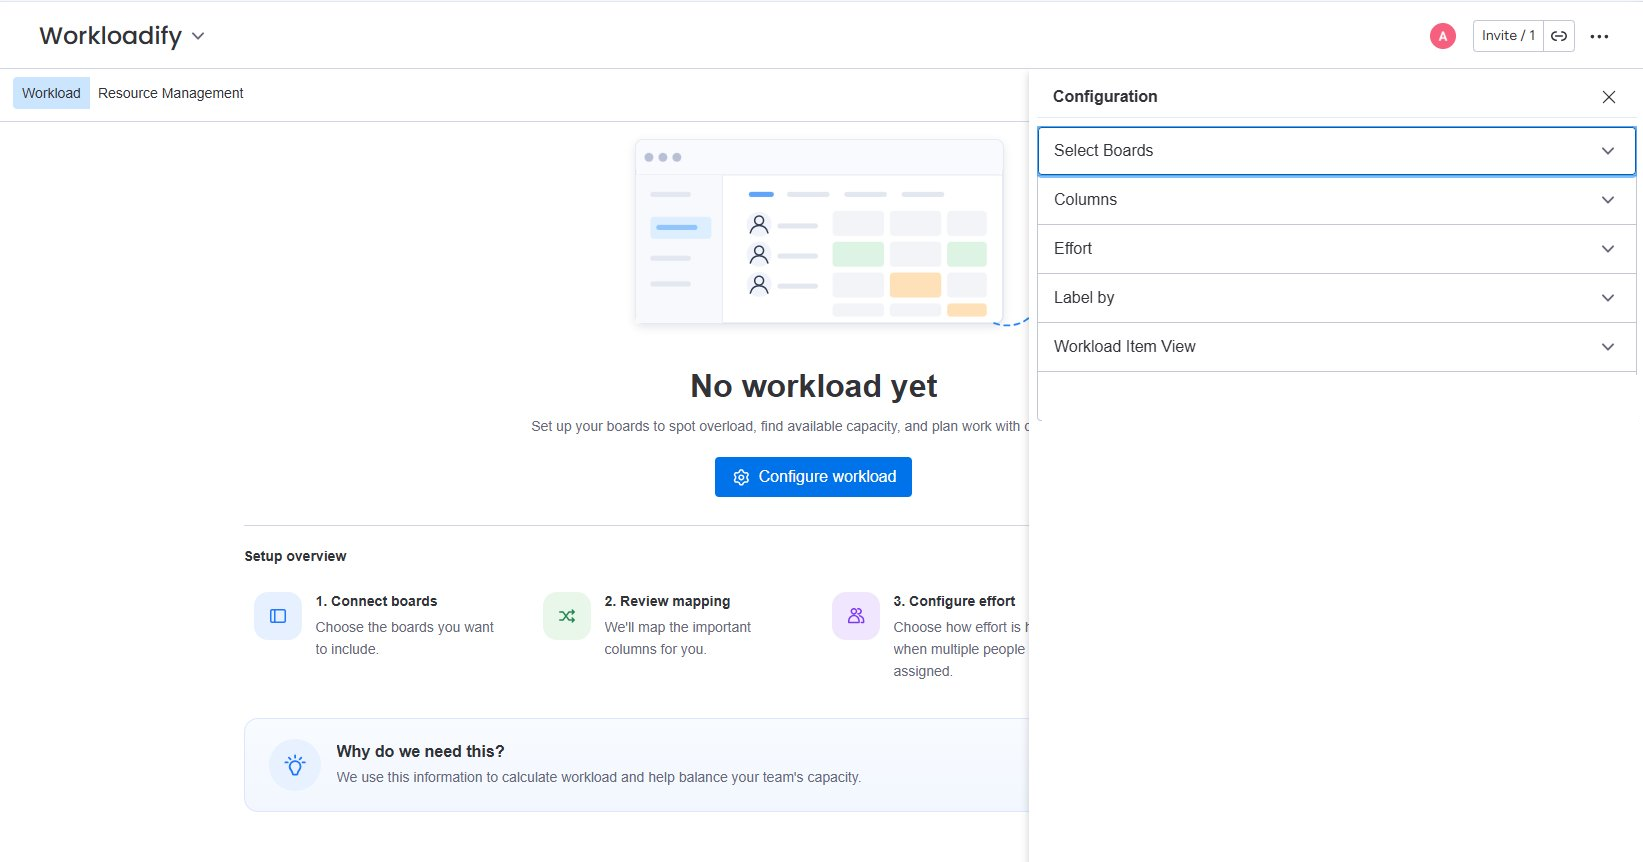
Your changes are reflected in the Workload view as you configure, so you can see the effect immediately.
Select boards
Workloadify calculates workload from the items on the boards you connect here.
- Open the Select Boards section.
- Choose a workspace from the dropdown.
- Use Search boards to find a board, or pick one from Recently used or All boards in workspace.
- Check the box next to each board you want to include.
Selected boards move to the Selected boards group at the top so you always know what's connected. You can connect as many boards as you need, and Workloadify merges their items into one workload picture.
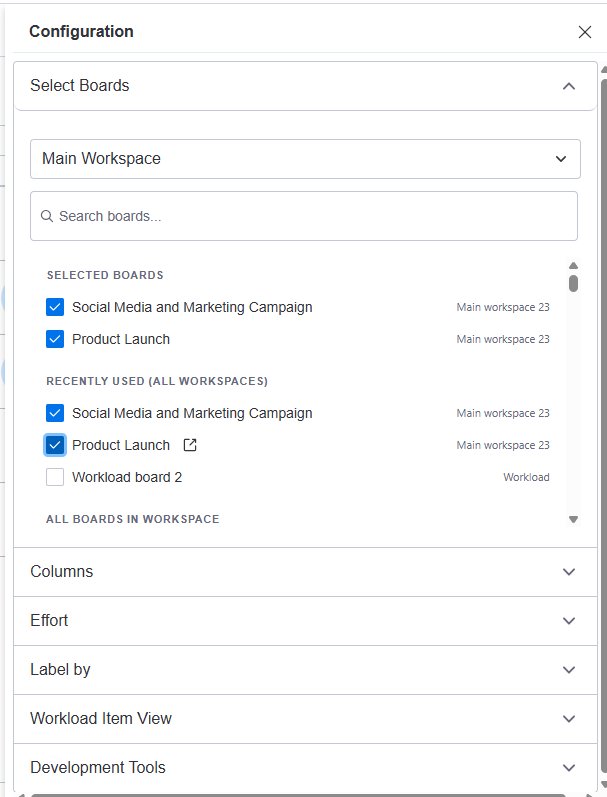
Which boards should I connect? Connect every board that contains work that should count toward your team's workload. For example, if one person works on items from both a Social Media and Marketing Campaign board and a Product Launch board, connect both so you see that person's complete workload — not just half of it.
Map your columns
Workloadify reads four columns from each connected board. It tries to match them automatically based on column type and name, so most of the time you just need to review the suggestions.
Open the Columns section. For each board you'll map:
| Column | What it should point to | Why it matters |
|---|---|---|
| Assignee | The People column with the person assigned to the item | Decides which person receives the item's workload |
| Status | The Status column | The status color is used to identify the item in the timeline |
| Timeline | The Timeline column | Defines the dates the item's effort is spread across |
| Effort | The Numbers column with the estimated effort | Defines how much work the item represents (for example, hours) |
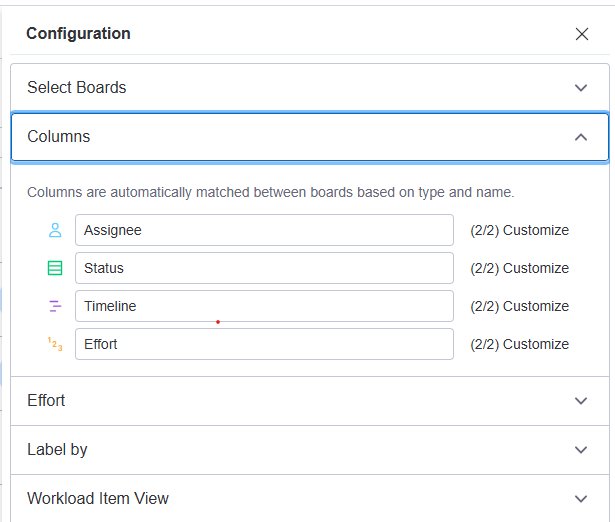
If you've connected more than one board, you'll see a counter such as (2/2) and a Customize option next to each column. Use Customize when your boards don't share identical column names — for example, if effort is called "Hours" on one board and "Estimate" on another. Open Customize and point each board to the correct column individually.
Important: An item is only included correctly when it has a mapped Assignee, Timeline, and Effort. Items without a timeline can't be placed on the date-based workload, and items without effort don't add any hours.
Choose how effort is allocated
When an item is assigned to more than one person, Workloadify needs to know how to share its effort. Open the Effort section and choose one mode.
Split — the total effort is divided equally among everyone assigned.
e.g. Item effort: 20 hours · Assigned people: 2 · Workload per person: 10 hours
Sum — the full effort is counted for every person assigned.
e.g. Item effort: 20 hours · Assigned people: 2 · Workload per person: 20 hours
Choose the mode that matches how your team estimates collaborative work. Use Split when an estimate represents the whole job to be shared; use Sum when each person is expected to do the full amount.
Choose how items are labeled
In the Label by section, you choose the extra context shown next to each item in the workload timeline:
- Board name — useful when you want to see which connected board an item comes from.
- Group name — useful when the groups inside your boards give more meaningful context.
Pick whichever helps your team identify items fastest.
Part 2 — Understand the Workload view
The Workload view gives you one combined picture of your team's work across every connected board, laid out over time.
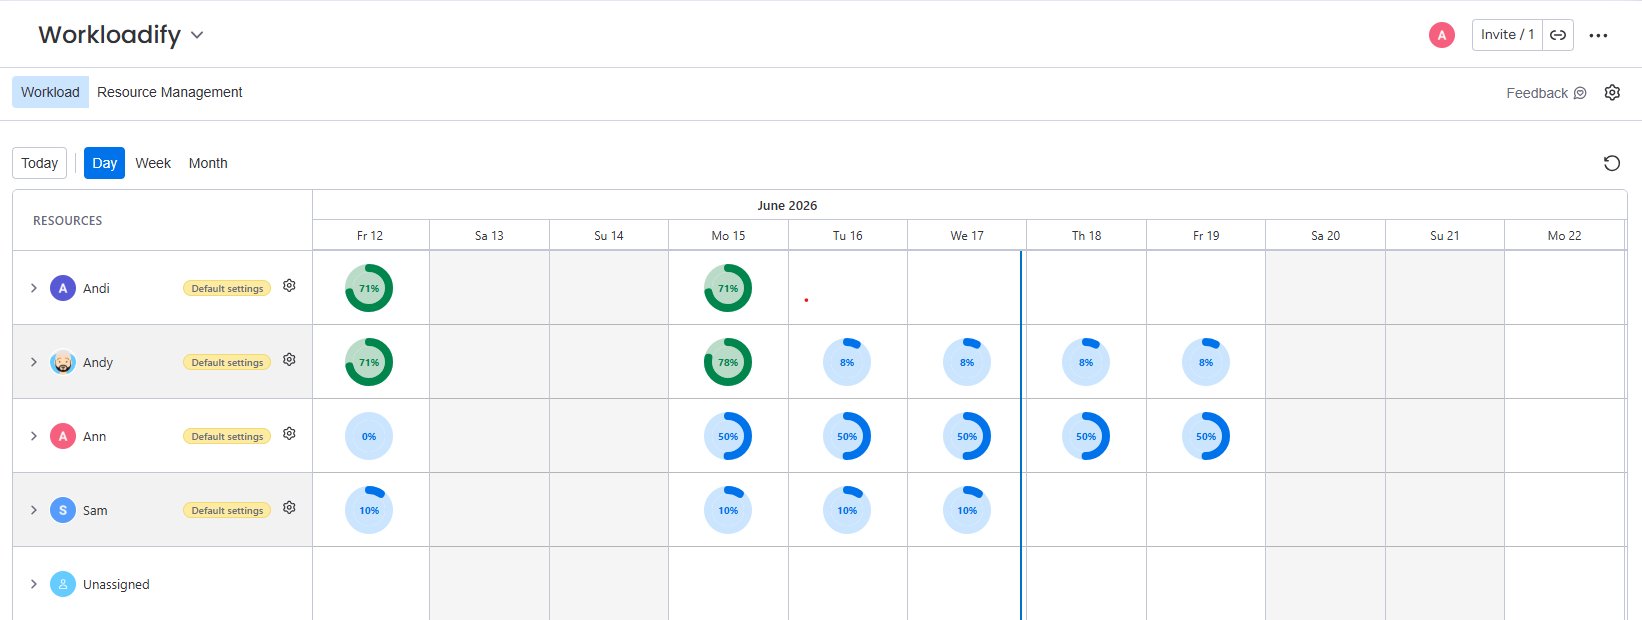
Anyone who has assigned items in the selected period appears automatically as a row. For each person, Workloadify calculates utilization from:
- the effort of their assigned items,
- the item timelines,
- their daily working capacity and working days,
- and their time off and public holidays.
Each cell shows a donut with a utilization percentage for that day (or week/month). At the bottom you'll also see an Unassigned row for work that has no one on it yet.
Change the time period
Use the controls at the top left to switch how time is grouped:
- Day — best for detailed, short-range planning.
- Week — a balanced overview.
- Month — the big picture for longer-range capacity planning.
Click Today to jump back to the current date at any time.
Read the workload colors
The donut color tells you, at a glance, how loaded each person is for that period:
- 🔵 Blue — under 50% capacity (plenty of room).
- 🟢 Green — around 50% to just under 100% (healthy, well-utilized).
- 🟡 Yellow — 100% (fully booked).
- 🔴 Red — above 100% (overloaded — more work assigned than capacity).
A red cell means that person has more assigned work than they can fit in that period, and is a signal to rebalance or extend a timeline.
See a person's assigned items
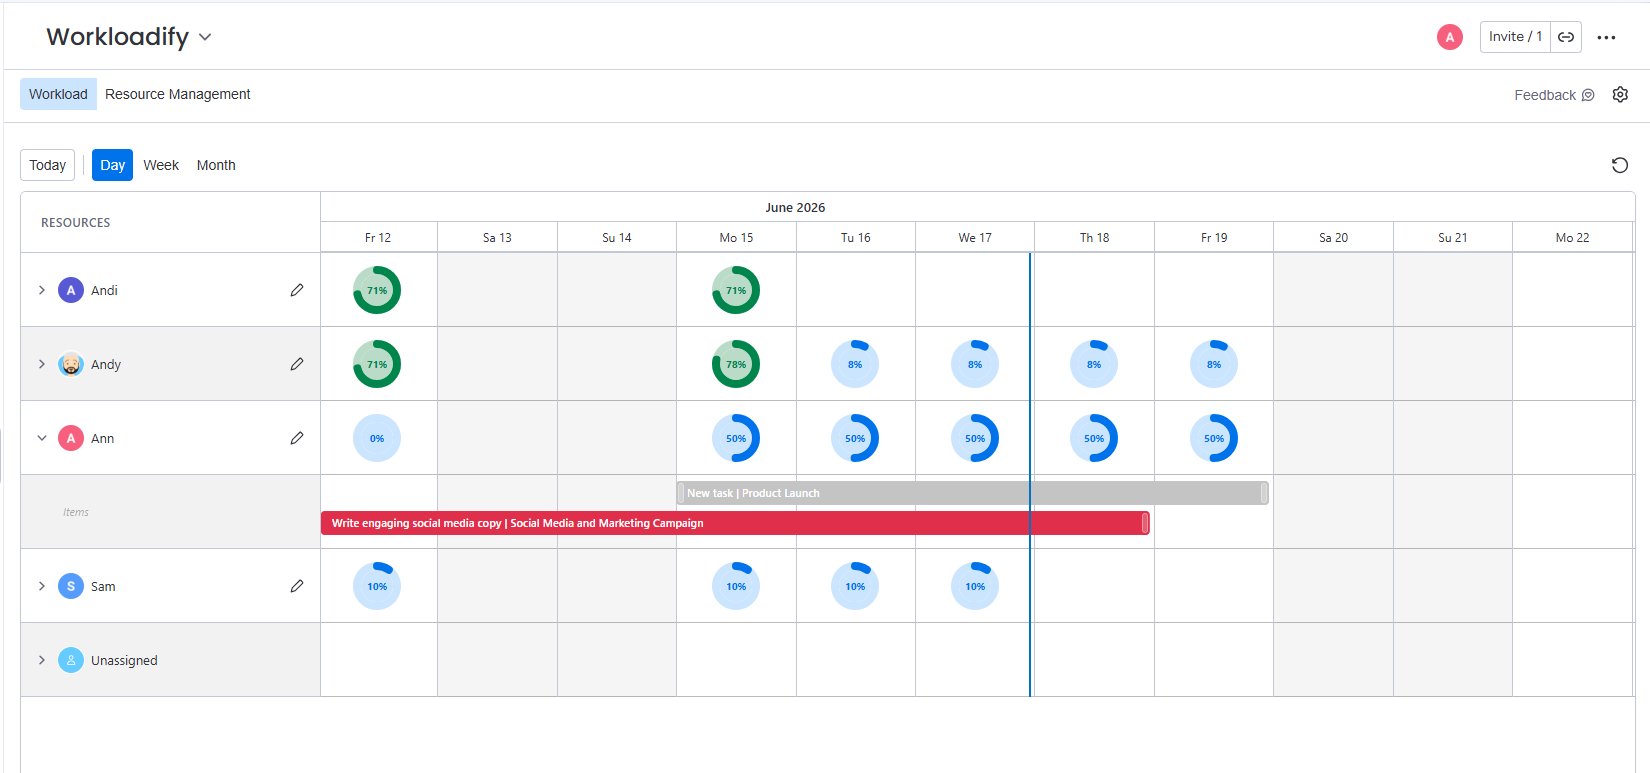
Click the arrow (>) next to a person to expand their row. Workloadify shows the items contributing to their workload as bars on the timeline, each with:
- the item name,
- its timeline (start to end),
- its status color,
- and its board or group label, depending on your Label by setting.
This makes it easy to see exactly which items are driving someone's load — and which one to move if they're overloaded.
Non-working days, holidays, and time off
Workloadify respects each person's real schedule when it places work on the calendar.
Days that fall outside a person's working days, public holidays for their selected country, and any time off you've added are treated as non-working days. These days are shown greyed out in that person's row, and Workloadify does not allocate any hours to them.
When a task's timeline spans a non-working day, the hours that would have landed on that day aren't lost — they're redistributed across the remaining working days within the task's date range. An info icon on the affected day explains this, so it's clear why a person's daily load looks higher on either side of a day off.
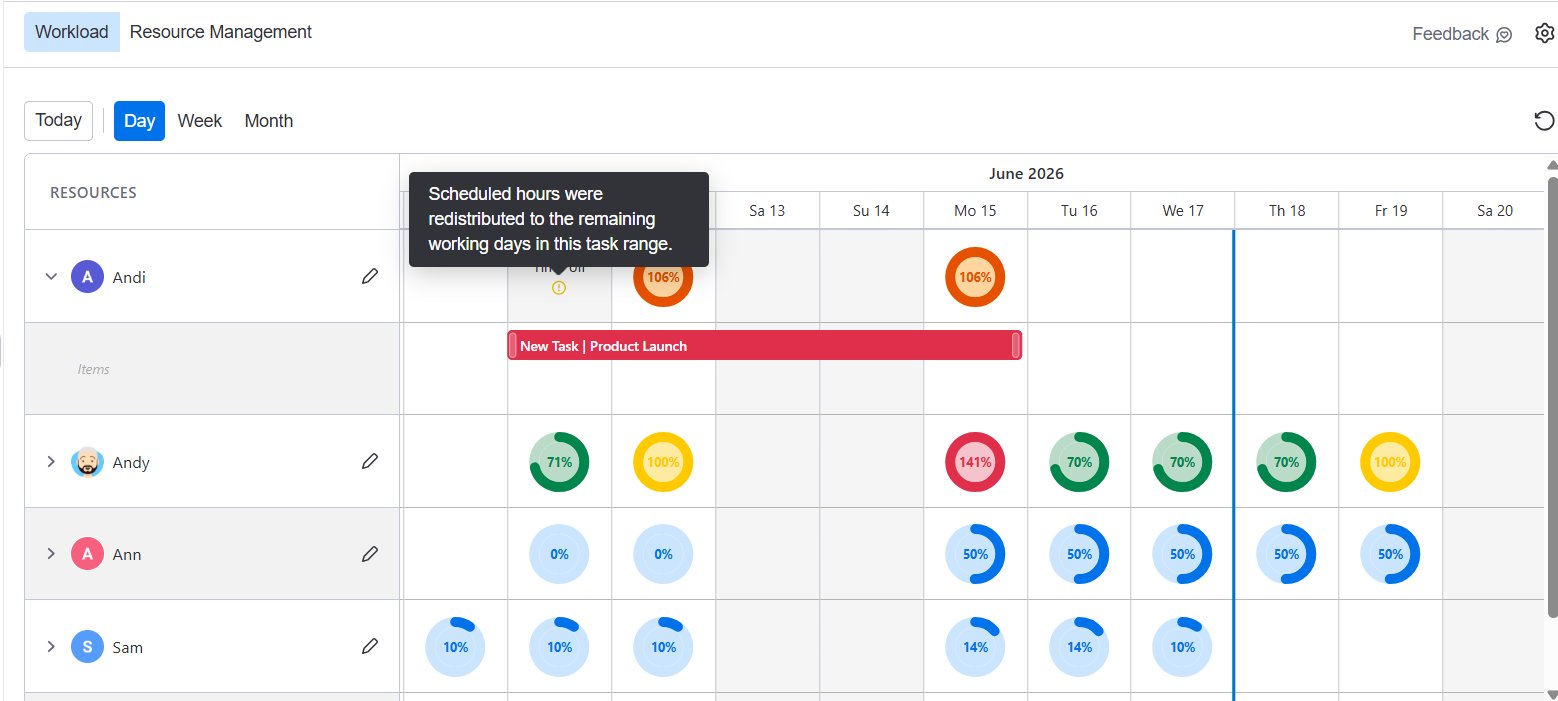
This is why the same task can show different daily percentages for two people: someone with a day off (or a public holiday) inside the task's window absorbs the same total effort across fewer days, so their per-day utilization is higher.
Assign unassigned items
Items with no assignee collect in the Unassigned row at the bottom of the view.
- Expand the Unassigned row.
- Find the item you want to assign.
- Select a person.
- Confirm.
The item is assigned on the underlying monday.com board (in the mapped Assignee column) and immediately added to that person's workload. For more guidance before choosing, you can also assign from inside an item using the Workloadify Assignee item view — see Part 4.
Part 3 — Default resources vs. managed resources
Workloadify shows two kinds of people.
A default resource appears automatically because they have assigned work in the period you're viewing. They use standard capacity and availability, and they're marked with a Default settings badge. If they ever have no assigned work in the period you're looking at, they simply disappear from the view.
A managed resource is someone you've saved. Workloadify keeps their working days, capacity, time off, roles, and skills, so they stay in your plan and their settings persist even when they temporarily have no work.
When you hover or click the Default settings badge, Workloadify reminds you that the person is using default capacity and offers to set them up.
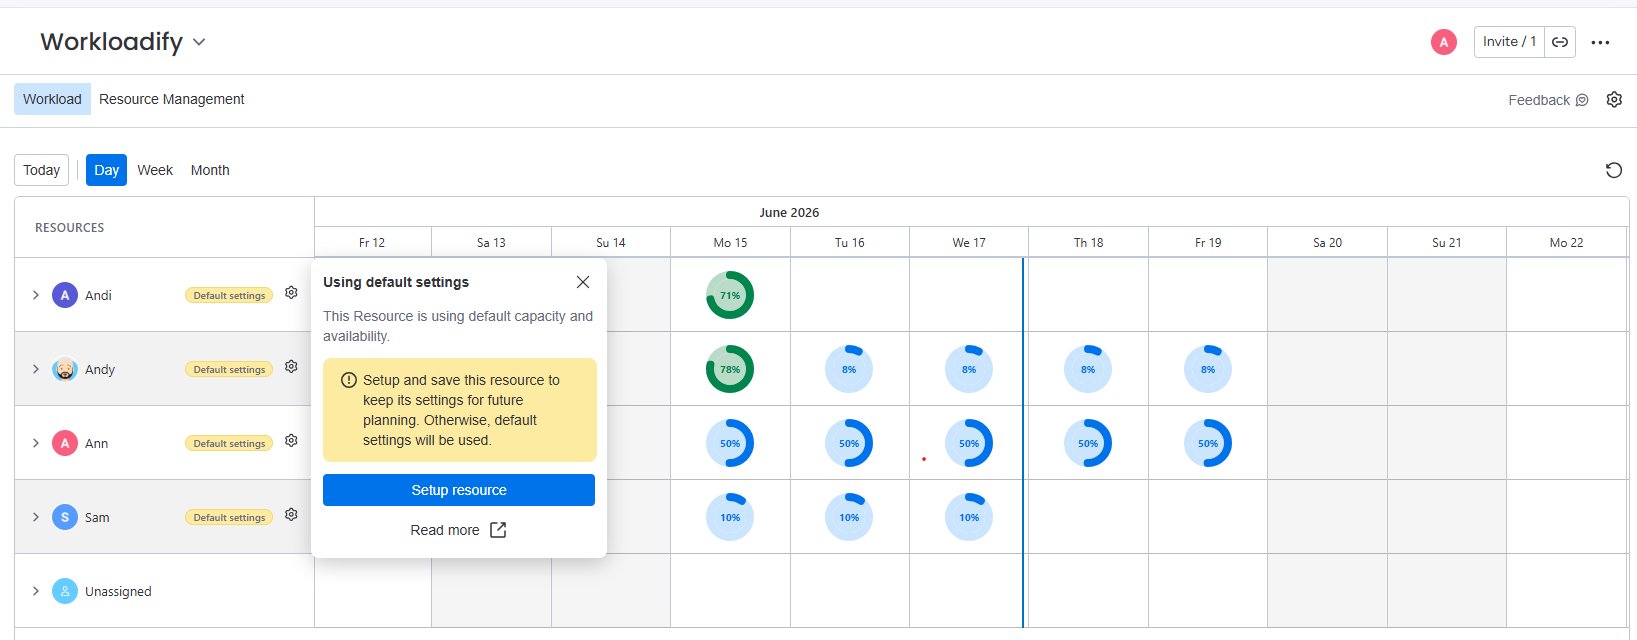
Why save a resource? Saving keeps a person's real working pattern in your plan permanently, gives you accurate capacity for assignment suggestions, and lets you add their roles, skills, time off, and holidays. Unsaved people are temporary; saved people are part of your team plan.
Save and configure a resource
To save someone and set up their details:
- In the Workload view, find the person.
- Click the gear icon on their row (or Setup resource in the default-settings popup).
- Configure the sections in the Resource settings window (below).
- Click Done to save.
Once saved, the Default settings badge is replaced by a pencil (edit) icon, and the person also appears in Resource Management.
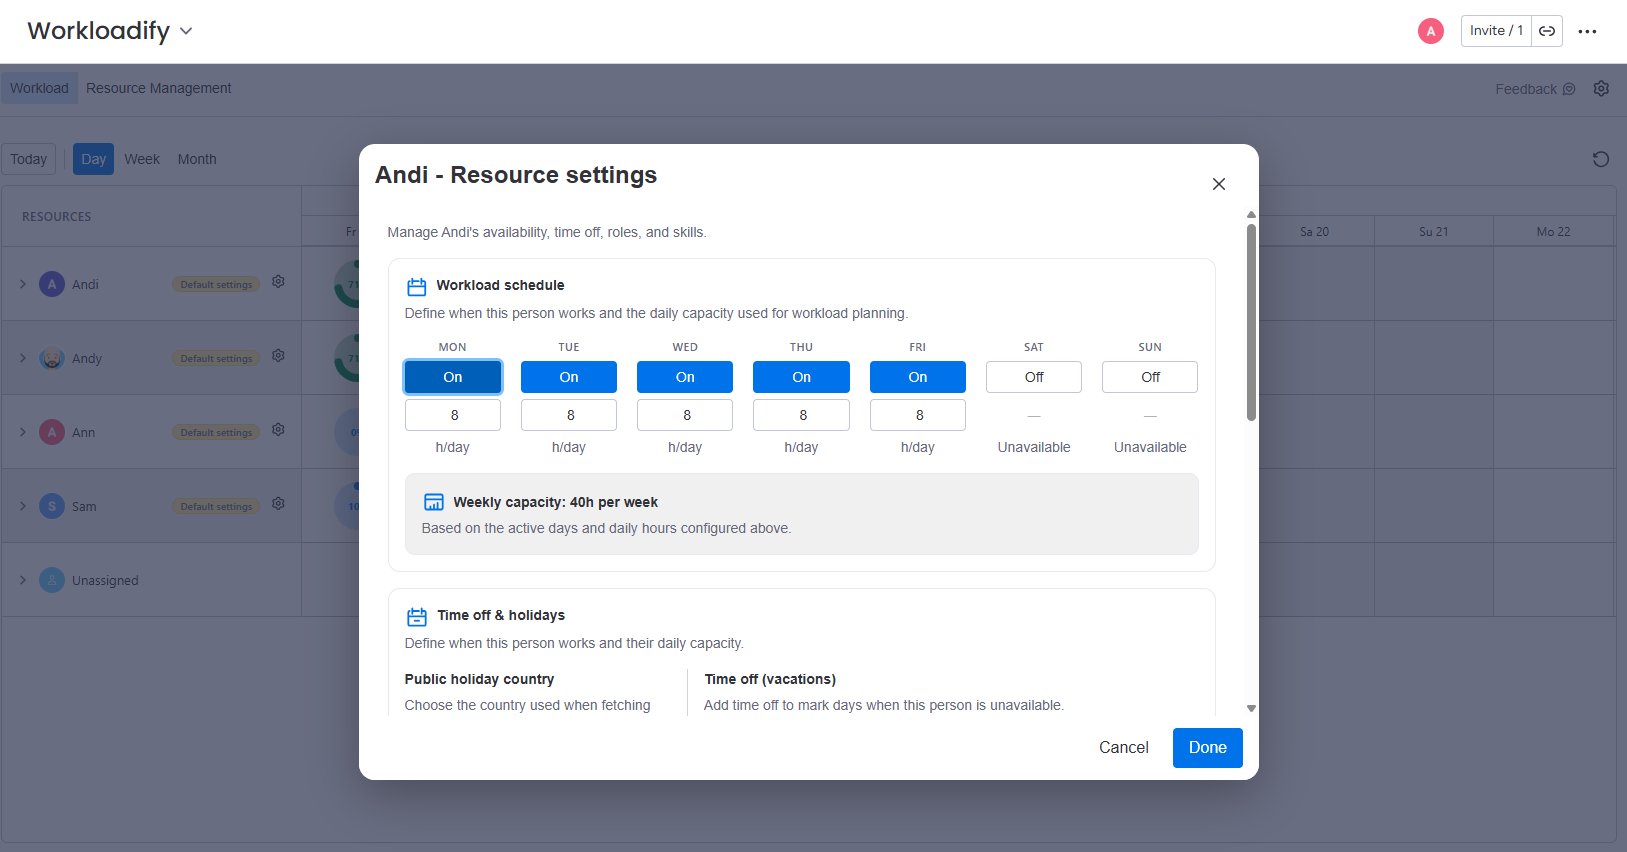
Workload schedule (working days and capacity)
Define when the person works and how many hours per day count toward planning.
For each day, toggle On or Off and set the h/day value. A day set to Off (or 0 hours) is treated as non-working and shown as Unavailable. By default a resource is typically Monday–Friday at 8 hours, with the weekend off.
You can give each day a different value — for example Monday 5h, Tuesday–Thursday 8h, Friday 0h. Workloadify adds it all up and shows the Weekly capacity automatically.
Time off & holidays
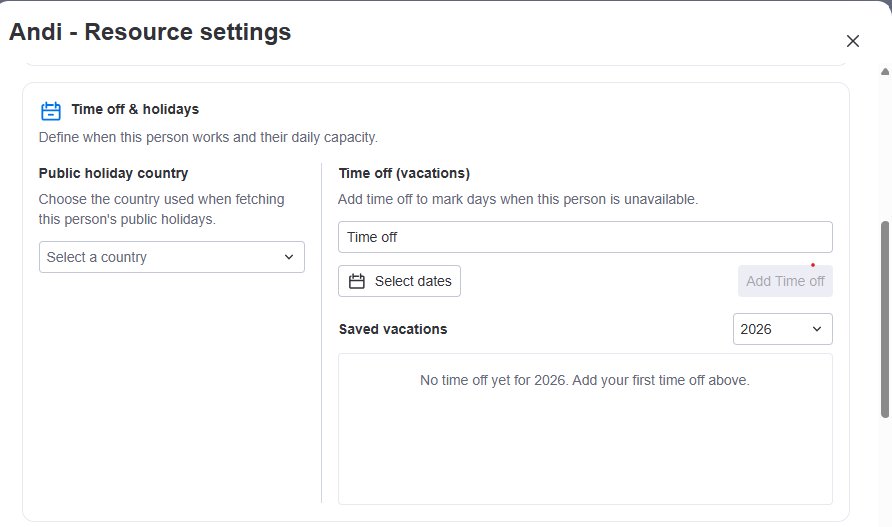
This section keeps the calendar realistic, so nobody is shown as available when they're not. Days you set here appear greyed out in the Workload view, and their hours are redistributed across the remaining working days of any task that spans them.
Public holiday country — choose the person's country, and Workloadify includes that country's public holidays in their availability automatically.
Time off (vacations) — add specific days a person is unavailable:
- Enter a name (for example, "Vacation" or "Day off").
- Click Select dates and choose a date or range.
- Click Add Time off.
Saved entries appear under Saved vacations, organized by year. You can remove an entry when it's no longer needed.
Roles & skills
Roles and skills help you understand whether a person is the right fit for an item, and they're shown in the Workloadify Assignee item view so you can judge suitability yourself.
- Roles describe what a person does (for example, Software Developer, Product Owner, Designer).
- Skills describe specific capabilities (for example, UX/UI, Java, Testing, Content writing).
To add them, use Search or add roles / Search or add skills to pick from ones you've already created, or type a new name and click Add role / Add skill. Anything you create is reusable across your whole team.
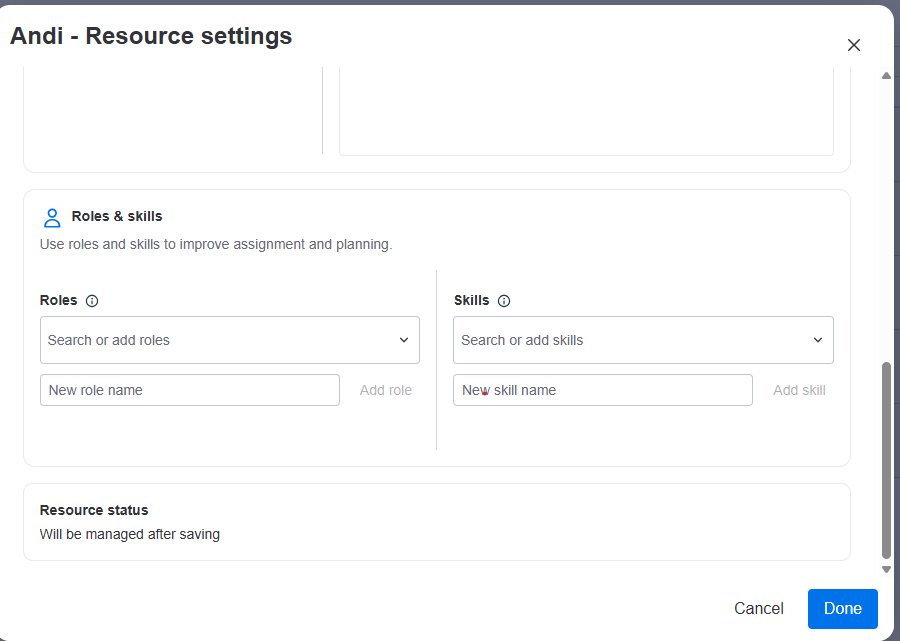
At the bottom, the Resource status confirms what will happen — for a new resource it reads Will be managed after saving. Click Done to finish.
Use the Resource Management view
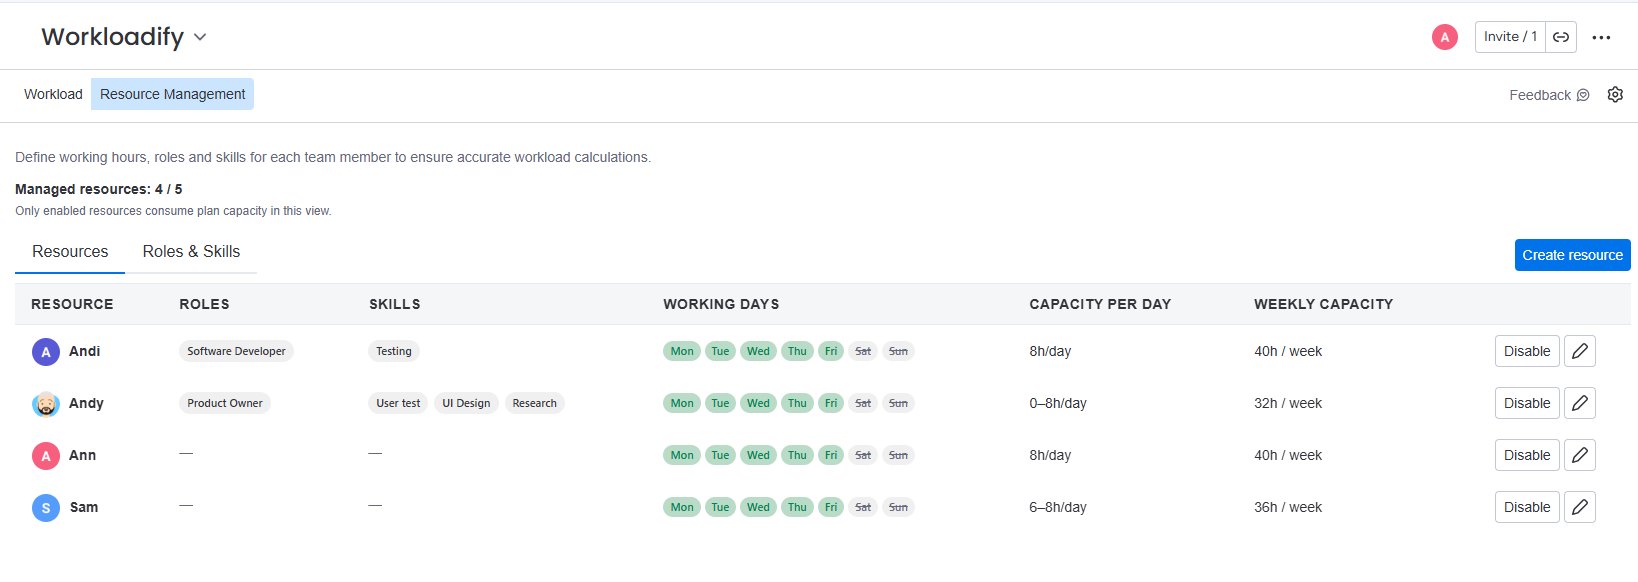
The Resource Management tab (next to Workload) is the single place to review and manage everyone you've saved.
At the top you'll see Managed resources: X / Y, where Y is how many resource slots your Workloadify plan allows. Only enabled resources count against this number.
The Resources tab lists each person with their roles, skills, working days, capacity per day, weekly capacity, and status. Capacity per day can show a range (for example, 6–8h/day) when someone's daily hours vary across the week. Use the pencil icon on any row to edit, or Disable to free up a slot.
A separate Roles & Skills tab lets you manage your reusable list of roles and skills in one place.
Create a resource manually
You don't have to wait for someone to appear in the Workload view. To add a person directly:
- Open Resource Management.
- Click Create resource.
- Select the person.
- Configure their working days and capacity.
- Add roles and skills if needed.
- Click Done.
This is handy for onboarding a teammate before any work has been assigned to them.
Disable a resource
Disable someone when you no longer need to manage them in Workloadify — for example when they leave the team or move off the project.
A disabled person:
- is no longer counted as an active managed resource,
- frees up a resource slot in your plan,
- and can be re-enabled later at any time.
Disabling only affects Workloadify. It does not remove the person or their assignments from monday.com.
Part 4 — Assigning work from an item
This is where Workloadify shines: you can pick the right person for a task without leaving the item you're already working in.
Add the Workloadify Assignee item view to each connected board where people should assign work.
- Open one of your connected boards.
- Open any item.
- Click the + icon in the item's view tabs (next to Updates, Files, and so on).
- Search for Workloadify Assignee item view and add it.
The view is then available on every item on that board.
Find the best person
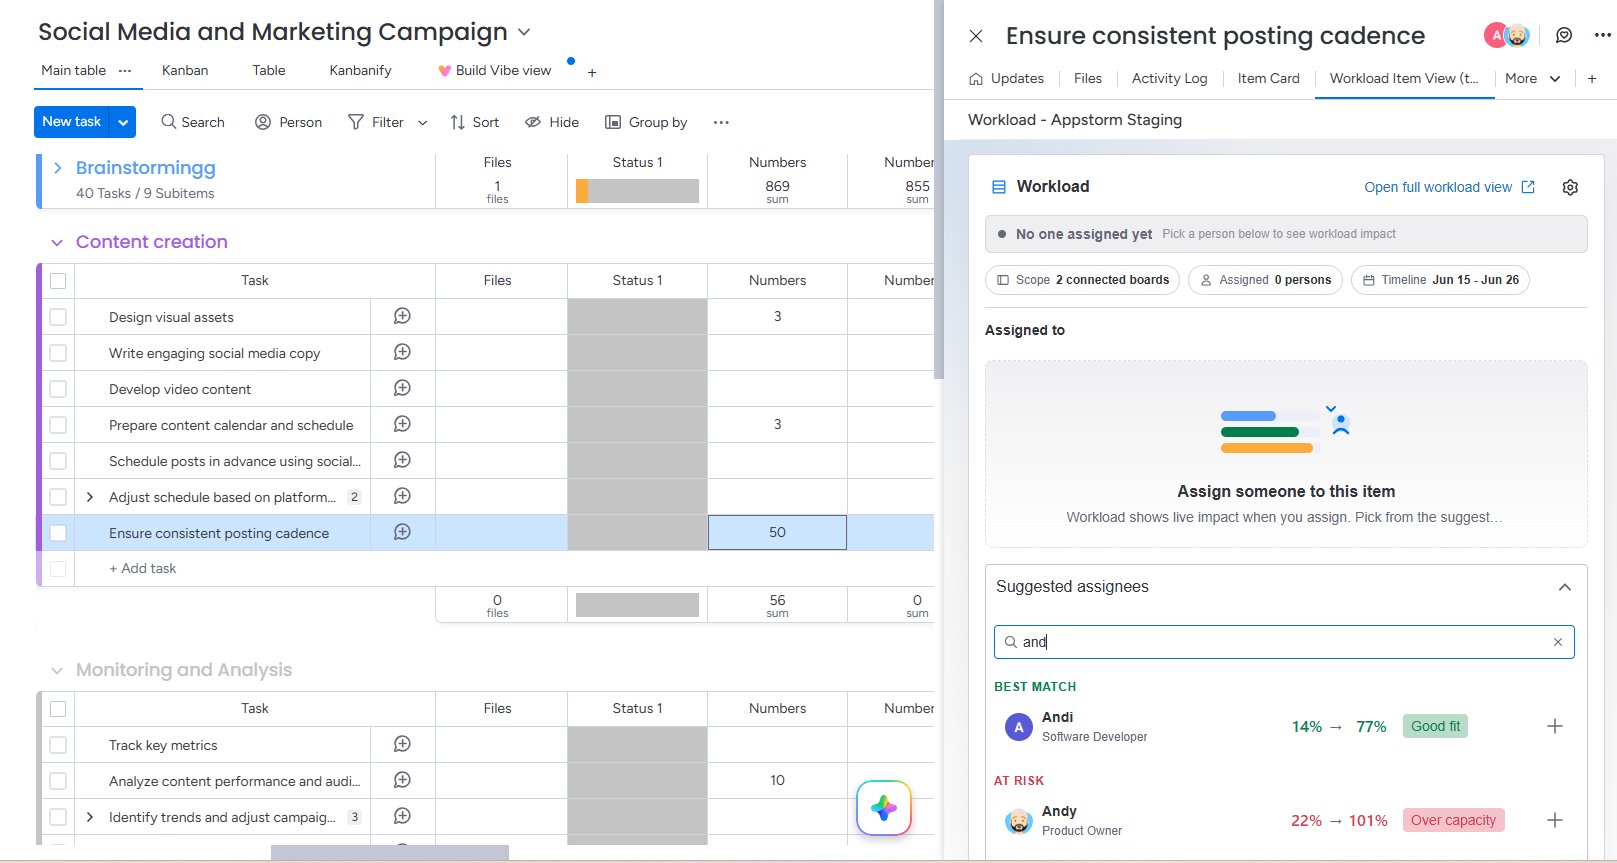
Open the Workloadify Assignee item view tab on the item. At the top you'll see a summary of the work: its Scope (how many connected boards are considered), how many people are Assigned, and the item's Timeline.
Under Suggested assignees, Workloadify ranks people for this item and time window based on their availability and free capacity:
- Best match — people who have the capacity to take the item on without going over, labeled Good fit.
- At risk — people who would tip into overload, labeled Over capacity.
Each person shows their workload before → after taking the item, so you can compare the impact instantly. You can also type in the search box to look up a specific person.
Workloadify also displays each person's role and skills (and flags any skill match) so you can judge fit yourself — but the Best match / At risk grouping reflects capacity, not roles or skills.
Review the projected impact
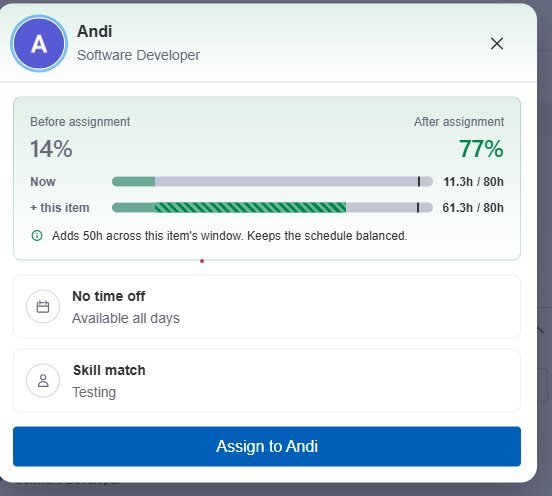
Click a suggested person to see exactly how the assignment would land before you commit:
- Before → after utilization for the item's window.
- Now vs. + this item in hours against their capacity (for example, 11.3h / 80h now, 61.3h / 80h with this item).
- A note about how many hours the item adds and whether the schedule stays balanced.
- Time off during the window, and any skill match shown for your reference.
The calculation always includes work from all connected boards — not just the board the current item lives on — so the projection reflects the person's real total load.
Assign the person
When you're happy with the projection, click Assign to [name]. Workloadify writes the person into the item's mapped Assignee column and updates their workload immediately.
You can assign more than one person to an item: reopen Suggested assignees and add another. When several people share an item, the effort is divided according to your Split or Sum setting.
Watch for over-capacity warnings
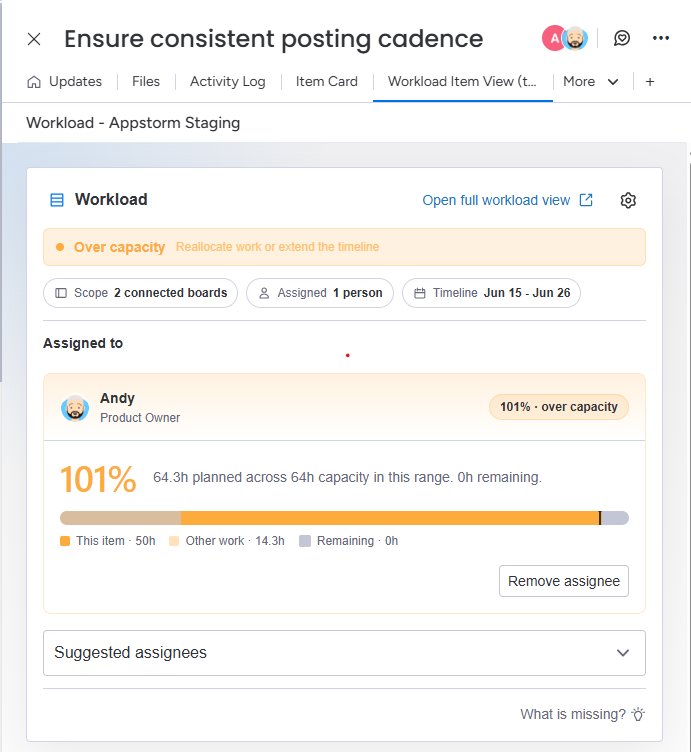
If an assignment pushes someone past their capacity, the item view flags it with an Over capacity banner and a prompt to reallocate work or extend the timeline. The person's bar breaks their load down into This item, Other work, and Remaining so you can see exactly where the pressure is.
From here you can Remove assignee and pick someone with more room, or adjust the timeline so the same effort spreads across more days.
Jump to the full Workload view
When you need broader context, click Open full workload view in the item view. This opens the complete Workload view directly, so you can compare schedules and loads across the whole team without navigating back manually.
Uninstalling the app
You can remove Workloadify from your monday.com account at any time. Apps are managed from the account's Admin area, so you'll need admin permissions to uninstall.
How to uninstall Workloadify
- Click your avatar in the bottom-left corner of monday.com and open Administration.
- Go to Apps and open the App permissions (installed apps) tab.
- Find Workloadify in the list of installed apps.
- Click the three-dot menu next to it and choose Uninstall, then confirm.
Your data is deleted permanently
Uninstalling is irreversible. A few minutes (typically 5-10 minutes) after the app is uninstalled, all of your Workloadify data and configuration are permanently deleted and cannot be recovered.
This includes every setting and record Workloadify stored for your account, such as:
- Connected boards and column mappings.
- Managed resources and their working days, daily capacity, public holidays, and time off.
- All other Workloadify settings and preferences saved for your account.
There is no grace period or backup once the deletion runs, so if you think you may reinstall later, make a note of any configuration you want to keep before you uninstall. If you only want to stop using Workloadify temporarily, consider simply removing it from your boards or restricting to specific workspaces instead of uninstalling it.
Frequently asked questions
Why does a person appear in the Workload view but not in Resource Management?
People with assigned work appear automatically in the Workload view using default settings. They only show up in Resource Management after you save them as a managed resource or create them manually.
Why did a person disappear from the Workload view?
An unsaved (default) person disappears when they no longer have assigned items in the displayed period. Save them as a managed resource to keep them in your plan permanently.
Why is an item not included in workload calculations?
Check that the item is on a connected board, that the Assignee, Timeline, and Effort columns are mapped correctly, and that the item has an assignee, a timeline, and an effort value.
Why does the item view show 0% projected workload?
The item probably has no effort value. Add an estimate to the mapped Effort (Numbers) column and reopen the item view.
Why is one person's daily percentage higher than another's for the same task?
If a person has a day off or a public holiday inside the task's window, Workloadify spreads the same total effort across fewer working days, so their per-day utilization is higher. Non-working days are shown greyed out and carry no hours.
Does Workloadify combine work from more than one board?
Yes. It combines workload from every board connected in the Configuration panel, in both the Workload view and the item view's projections.
Can different people have different working hours?
Yes. Each managed resource can have its own working days, daily capacity, public holidays, and time off — including different hours on different days.
Can I assign work straight from the Workload view?
Yes — from the Unassigned row. For more context before choosing, use the Workloadify Assignee item view inside an individual item.
What's the difference between the Workload view and the Workloadify Assignee item view?
The Workload view is the team-wide overview across people, dates, and connected boards. The Workloadify Assignee item view lives inside a single item and helps you pick the right person for that specific task.
Troubleshooting
No people are shown.
Make sure the connected boards have items with people in the mapped Assignee column, and that the selected date period overlaps those items' timelines.
Workload values look wrong.
Check, in order: the mapped Assignee/Timeline/Effort columns, the item's effort value, whether effort is set to Split or Sum, the resource's daily capacity, their time off and public holidays, and whether all relevant boards are connected.
Roles or skills don't appear in the item view.
Open the resource's settings, add the relevant roles and skills, and make sure the resource is saved.
A public holiday is missing.
Confirm the correct country is selected in that resource's Time off & holidays settings.
An item doesn't appear under the expected person.
Verify the person is set in the mapped Assignee column and that the item's timeline overlaps the period shown in the Workload view.